OpenIndianaでTRILLを用いたバックボーンファブリックなのです!
Posted on 2014/05/18(Sun) 22:25 in technical
Summary
TRILLを試してみたいけど、新しく機材を買うなんてとんでもない!
\!すでのな/
というわけで、(何故か)TRILLが実装されているOpenIndianaを使って、ちょっとしたバックボーンを作ってみるのです。
でも結論から言うとかなりTRILLとしての期待は薄い。プロトコル見るレベル。
環境構成図
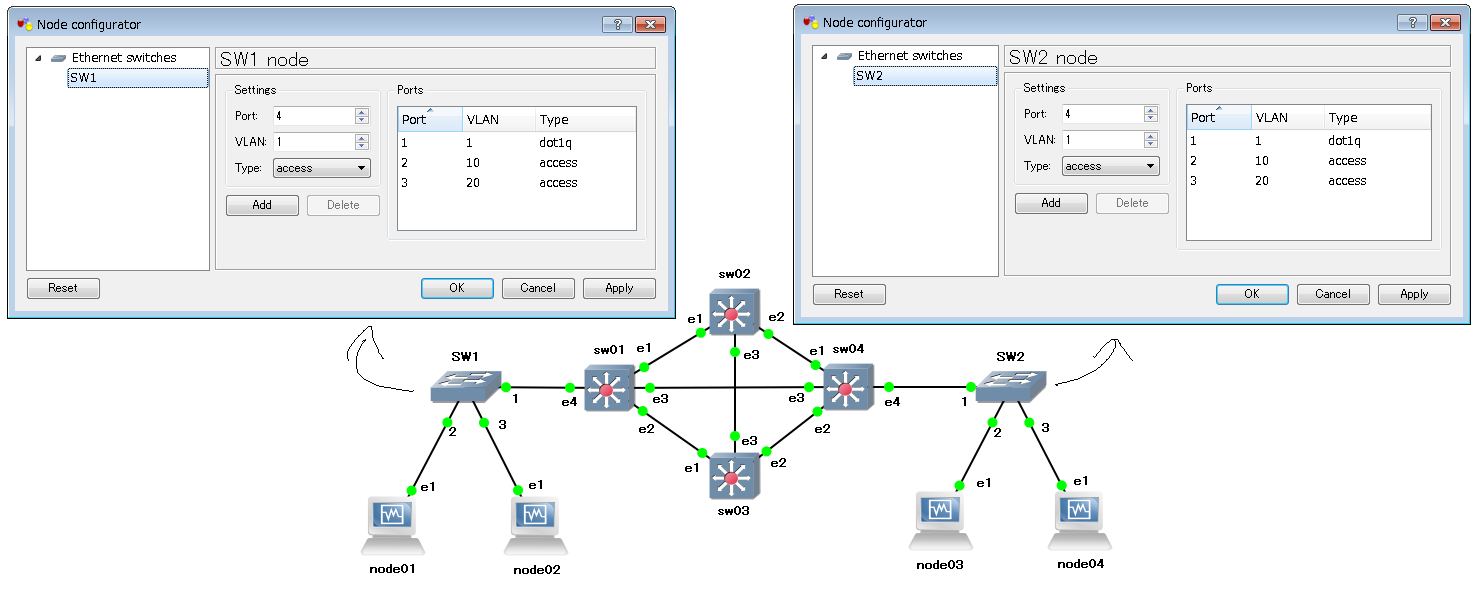
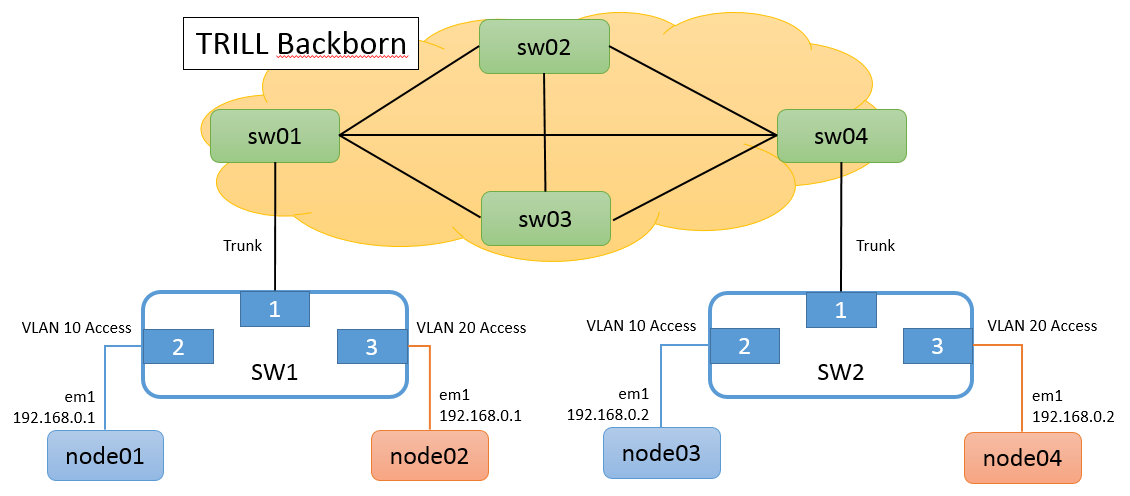
図のようなGNS3+VirtualBox環境を作ります。

登場人物:
sw01 : OpenIndiana 151a9 on VirtualBox
sw02 : OpenIndiana 151a9 on VirtualBox
sw03 : OpenIndiana 151a9 on VirtualBox
sw04 : OpenIndiana 151a9 on VirtualBox
node01 : BSDRP 1.5 on VirtualBox
node02 : BSDRP 1.5 on VirtualBox
node03 : BSDRP 1.5 on VirtualBox
node04 : BSDRP 1.5 on VirtualBox
通報
BSDRP(http://bsdrp.net/)は、ダウンロードしたイメージをVirtualBox用に変換しただけの状態です。
OpenIndianaについては、OpenIndiana公式サイト(http://openindiana.org/)からダウンロードした151a8 server x86のディスクを使用してインストール直後の状態からスタートします。
ただし、GNS3でConsoleを使用するためのSerial設定(後述)をし、ついでに151a9にアップデートします(なので登場人物的には151a9です)。
OpenIndianaをGNS3で使う用のConsole設定
GNS3を使うのは、単にトポロジが見やすいというだけでなく、VBox仮想マシン起動時のGUIをOFFにして起動するHeadlessモードをサポートしているという点においても、なかなか便利です。
ノード名毎にSerial Pipeが設定され、GNS3から起動中のノードのシリアル画面を一斉に開くボタンがあるので、VBoxで各仮想マシンのSerial設定をして、接続用のターミナル設定をするより遥かに楽です。
と言うわけで、OpenIndianaのアップデートと合わせてSerialの設定もしてしまいましょう。
まずはアップデート:
$ su -
# pkg update
# reboot
$ uname -a
SunOS openindiana 5.11 oi_151a9 i86pc i386 i86pc Solaris
警告
TRILLを使うことを考えると、バックボーン間ではMTUを拡大しておく必要があると考えられるのですが、GNS3環境ではJumboFrameを使用するとISISパケットが破損するみたいなので、保留です。
一応、方法としては以下のようになると思うのです。
# sed -i -e 's/MaxFrameSize=0,0,0,0,0,0,0,0,0/MaxFrameSize=0,1,1,1,1,0,0,0,0/g' /kernel/drv/e1000g.conf
# reboot
こっちの方法(http://docs.oracle.com/cd/E26924_01/html/E25834/gkind.html#ggtwf)は、読んだ通りに設定しても、結局
dladm: warning: cannot set link property 'mtu' on 'e1000g1': link busy
とか言われてションボリするんですけど、僕だけなんですかね。
最後に、GRUBのタイムアウト時間を5秒にして、Serialの設定をします(面倒なのでGRUB画面はSerialに飛ばさないようにします):
$ su -
# bootadm set-menu timeout=5
# eeprom console=ttya ttya-mode="9600,8,n,1,-"
# bootadm update-archive
# svcadm restart console-login
# shutdown -i5 -g0 -y
通報
bootadm set-menu timeout=5 でGRUBのタイムアウト時間を短くしているのは、単に僕がせっかちだからです。
通報
速度を9600[bps]ではなく、115200[bps]とかにしたい場合は、さらに/etc/ttydefsのconsole:から始まる行を編集します
ここまでで、GNS3でOpenIndianaを使う準備が出来ました。
ベースとなるイメージで適当にスナップショットを取って、4台分クローンを作りましょう。
TRILLの設定
sw01
e1000g0がVitrualBoxのNATからインターネットに抜けられるようになっています:
# ipadm show-addr
ADDROBJ           TYPE     STATE        ADDR
lo0/v4            static   ok           127.0.0.1/8
e1000g0/_b        dhcp     ok           10.0.2.15/24
e1000g1/_b        dhcp     ok           ?
e1000g2/_b        dhcp     ok           ?
e1000g3/_b        dhcp     ok           ?
e1000g4/_b        dhcp     ok           ?
lo0/v6            static   ok           ::1/128
e1000g0/_a        addrconf ok           fe80::a00:27ff:fe3b:467e/10
e1000g1/_a        addrconf ok           fe80::a00:27ff:fe3b:28c9/10
e1000g2/_a        addrconf ok           fe80::a00:27ff:fec4:162c/10
e1000g3/_a        addrconf ok           fe80::a00:27ff:fed3:fd00/10
e1000g4/_a        addrconf ok           fe80::a00:27ff:fe15:5634/10
変にトラフィックが流れるのも好ましくないので、TRILL Bridgeに収容するインタフェースからは、IPを削除します。:
# ipadm delete-if e1000g1
# ipadm delete-if e1000g2
# ipadm delete-if e1000g3
# ipadm delete-if e1000g4
さて、Solaris 11.1のページを見ると、TRILLの設定方法が書いてあるわけですよ。
http://docs.oracle.com/cd/E37932_01/html/E36607/administerbridges.html#modifybridgetask
ふむふむ~、試しにTRILLブリッジを作ってみよう:
# dladm create-bridge -l e1000g1 -l e1000g2 -l e1000g3 trillbr
# dladm show-bridge
BRIDGE      PROTECT ADDRESS            PRIORITY DESROOT
trillbr     stp     32768/8:0:27:3b:28:c9 32768 32768/8:0:27:3b:28:c9
# dladm modify-bridge -P trill trillbr
dladm: create operation failed: optional software not installed
ふぇぇ...おこられたよう...(当たり前)
TRILLはISISを使うから、quaggaが必要なんだよ?
でも、とりあえずTRILLっぽいものを探して適当なコマンド打ってみるのも風情があるよね!:
# pkg search trill
INDEX      ACTION VALUE                        PACKAGE
basename   file   kernel/socketmod/amd64/trill pkg:/system/kernel@0.5.11-0.151.1.9
basename   file   kernel/socketmod/trill       pkg:/system/kernel@0.5.11-0.151.1.9
# pkg install trill
Creating Plan
pkg install: The following pattern(s) did not match any allowable packages.  Try
using a different matching pattern, or refreshing publisher information:

        trill
ふぇぇ...おこられたよう...(二度目)
正しくはこうです(真顔):
# pkg install quagga
# dladm modify-bridge -P trill trillbr
# dladm show-bridge
BRIDGE      PROTECT ADDRESS            PRIORITY DESROOT
trillbr     trill   32768/8:0:27:3b:28:c9 32768 32768/8:0:27:d:98:91
# dladm show-bridge -l trillbr
LINK        STATE       UPTIME  DESROOT
e1000g1     non-stp     360     32768/8:0:27:d:98:91
e1000g2     non-stp     360     32768/8:0:27:d:98:91
e1000g3     non-stp     360     32768/8:0:27:d:98:91
# dladm show-bridge -t trillbr
60542 L    --          --
# dladm show-bridge -f trillbr
DEST             AGE    FLAGS OUTPUT
8:0:27:3b:28:c9  --     L     e1000g1
8:0:27:c4:16:2c  --     L     e1000g2
8:0:27:d3:fd:0   --     L     e1000g3
やったね、今度はTRILLが動いてるっぽく見えるようになったよ。
通報
dladm show-bridge -t trillbr が見えるようになるまで、結構時間かかります。2,3分くらいかな。
sw02, sw03, sw04
と言うわけで、残りのSWに同じ要領で設定します。:
# ipadm delete-if e1000g1
# ipadm delete-if e1000g2
# ipadm delete-if e1000g3
# ipadm delete-if e1000g4
# pkg install quagga
# dladm create-bridge -l e1000g1 -l e1000g2 -l e1000g3 -P trill trillbr
確認
最終的にこんな感じになればよいです。:
#  dladm show-bridge -l trillbr
LINK        STATE       UPTIME  DESROOT
e1000g1     non-stp     0       0/0:0:0:0:0:0
e1000g2     non-stp     0       0/0:0:0:0:0:0
e1000g3     non-stp     0       0/0:0:0:0:0:0
#  dladm show-bridge -t trillbr
NICK FLAGS LINK        NEXTHOP
17188 --   e1000g2     8:0:27:8a:fa:7d
17392 --   e1000g3     8:0:27:b9:80:92
60542 --   e1000g1     8:0:27:69:a4:83
64025 L    --          --
周辺設定
この辺は正直割とどうでもいいので、ちゃっちゃか設定するよ。
node01, node02
# ifconfig em1 192.168.0.1/24 up
node03, node04
# ifconfig em1 192.168.0.2/24 up
sw01, sw04
最後にノード側SWとの接続インタフェースもTRILL Bridgeに収容します。
ただし、ブリッジがVLANの転送を行うには、対象ポートでVLANインタフェースが作成されている必要があります(http://docs.oracle.com/cd/E26924_01/html/E25834/rbridgesoverview.html#vlanadministration)。
なのでノード側インタフェースでは、VLANインタフェースを作成しておく必要があります:
# dladm create-vlan -l e1000g4 -v 10
# dladm create-vlan -l e1000g4 -v 20
# dladm add-bridge -l e1000g4 trillbr
通報
後から対象VLANを増やす場合、bridgeとtrillサービスを再起動する必要がありそうです。
# dladm create-vlan -l e1000g4 -v 30
# svcadm restart bridge
# svcadm restart trill
こんな感じですかね。
動作確認
キャプチャ取りながら、iperfでUDPトラフィック流してみましょう。
sw01, sw04
# snoop -d e1000g1 -o `hostname`-e1000g1-snoop.pcap &
# snoop -d e1000g2 -o `hostname`-e1000g2-snoop.pcap &
# snoop -d e1000g3 -o `hostname`-e1000g3-snoop.pcap &
# snoop -d e1000g4 -o `hostname`-e1000g4-snoop.pcap &
通報
# hostname swX で設定しておくと楽です。
node01、node02
UDP Traffic Listen:
# iperf -s -u -i 1
node03, node04
UDP Traffic node03 -> node01 Transmit:
# iperf -t 30 -u -i 1 -l 1000 -c 192.168.0.1
警告
JumboFrameが使えないのでデフォルトのロングサイズだとMTUが足りなくてウボァするので、1000Byte位にしておく。これが日和見というやつである。
sw01, sw04
pkill snoop
node03
------------------------------------------------------------
Client connecting to 192.168.0.1, UDP port 5001
Sending 1000 byte datagrams
UDP buffer size: 9.00 KByte (default)
------------------------------------------------------------
[  3] local 192.168.0.2 port 23290 connected with 192.168.0.1 port 5001
[ ID] Interval       Transfer     Bandwidth
[  3]  0.0- 1.0 sec   128 KBytes  1.05 Mbits/sec
[  3]  1.0- 2.0 sec   128 KBytes  1.05 Mbits/sec
[  3]  2.0- 3.0 sec   128 KBytes  1.05 Mbits/sec
[  3]  3.0- 4.0 sec   128 KBytes  1.05 Mbits/sec
[  3]  4.0- 5.0 sec   128 KBytes  1.05 Mbits/sec
[  3]  5.0- 6.0 sec   128 KBytes  1.05 Mbits/sec
[  3]  6.0- 7.0 sec   128 KBytes  1.05 Mbits/sec
[  3]  7.0- 8.0 sec   128 KBytes  1.05 Mbits/sec
[  3]  8.0- 9.0 sec   127 KBytes  1.04 Mbits/sec
[  3]  9.0-10.0 sec   128 KBytes  1.05 Mbits/sec
[  3] 10.0-11.0 sec   128 KBytes  1.05 Mbits/sec
[  3] 11.0-12.0 sec   128 KBytes  1.05 Mbits/sec
[  3] 12.0-13.0 sec   130 KBytes  1.06 Mbits/sec
[  3] 13.0-14.0 sec   127 KBytes  1.04 Mbits/sec
[  3] 14.0-15.0 sec   129 KBytes  1.06 Mbits/sec
[  3] 15.0-16.0 sec   128 KBytes  1.05 Mbits/sec
[  3] 16.0-17.0 sec   128 KBytes  1.05 Mbits/sec
[  3] 17.0-18.0 sec   128 KBytes  1.05 Mbits/sec
[  3] 18.0-19.0 sec   128 KBytes  1.05 Mbits/sec
[  3] 19.0-20.0 sec   128 KBytes  1.05 Mbits/sec
[  3] 20.0-21.0 sec   128 KBytes  1.05 Mbits/sec
[  3] 21.0-22.0 sec   128 KBytes  1.05 Mbits/sec
[  3] 22.0-23.0 sec   128 KBytes  1.05 Mbits/sec
[  3] 23.0-24.0 sec   129 KBytes  1.06 Mbits/sec
[  3] 24.0-25.0 sec   127 KBytes  1.04 Mbits/sec
[  3] 25.0-26.0 sec   129 KBytes  1.06 Mbits/sec
[  3] 26.0-27.0 sec   127 KBytes  1.04 Mbits/sec
[  3] 27.0-28.0 sec   129 KBytes  1.06 Mbits/sec
[  3] 28.0-29.0 sec   128 KBytes  1.05 Mbits/sec
[  3] 29.0-30.0 sec   128 KBytes  1.05 Mbits/sec
[  3]  0.0-30.0 sec  3.75 MBytes  1.05 Mbits/sec
[  3] Sent 3933 datagrams
[  3] WARNING: did not receive ack of last datagram after 10 tries.
node01
------------------------------------------------------------
Server listening on UDP port 5001
Receiving 1470 byte datagrams
UDP buffer size: 41.1 KByte (default)
------------------------------------------------------------
[  3] local 192.168.0.1 port 5001 connected with 192.168.0.2 port 23290
[ ID] Interval       Transfer     Bandwidth        Jitter   Lost/Total Datagrams
[  3]  0.0- 1.0 sec   127 KBytes  1.04 Mbits/sec   0.236 ms    0/  130 (0%)
[  3]  1.0- 2.0 sec   128 KBytes  1.05 Mbits/sec   0.357 ms    0/  131 (0%)
[  3]  2.0- 3.0 sec   128 KBytes  1.05 Mbits/sec   0.342 ms    0/  131 (0%)
[  3]  3.0- 4.0 sec   128 KBytes  1.05 Mbits/sec   0.654 ms    0/  131 (0%)
[  3]  4.0- 5.0 sec   128 KBytes  1.05 Mbits/sec   0.397 ms    0/  131 (0%)
[  3]  5.0- 6.0 sec   128 KBytes  1.05 Mbits/sec   0.463 ms    0/  131 (0%)
[  3]  6.0- 7.0 sec   128 KBytes  1.05 Mbits/sec   0.640 ms    0/  131 (0%)
[  3]  7.0- 8.0 sec   128 KBytes  1.05 Mbits/sec   0.423 ms    0/  131 (0%)
[  3]  8.0- 9.0 sec   129 KBytes  1.06 Mbits/sec   0.405 ms    0/  132 (0%)
[  3]  9.0-10.0 sec   128 KBytes  1.05 Mbits/sec   0.789 ms    0/  131 (0%)
[  3] 10.0-11.0 sec   129 KBytes  1.06 Mbits/sec   1.163 ms    0/  132 (0%)
[  3] 11.0-12.0 sec   128 KBytes  1.05 Mbits/sec   0.520 ms    0/  131 (0%)
[  3] 12.0-13.0 sec   127 KBytes  1.04 Mbits/sec   0.370 ms    0/  130 (0%)
[  3] 13.0-14.0 sec   127 KBytes  1.04 Mbits/sec   0.397 ms    0/  130 (0%)
[  3] 14.0-15.0 sec   129 KBytes  1.06 Mbits/sec   0.354 ms    0/  132 (0%)
[  3] 15.0-16.0 sec   128 KBytes  1.05 Mbits/sec   0.240 ms    0/  131 (0%)
[  3] 16.0-17.0 sec   128 KBytes  1.05 Mbits/sec   0.246 ms    0/  131 (0%)
[  3] 17.0-18.0 sec   128 KBytes  1.05 Mbits/sec   0.573 ms    0/  131 (0%)
[  3] 18.0-19.0 sec   128 KBytes  1.05 Mbits/sec   0.397 ms    0/  131 (0%)
[  3] 19.0-20.0 sec   128 KBytes  1.05 Mbits/sec   0.620 ms    0/  131 (0%)
[  3] 20.0-21.0 sec   128 KBytes  1.05 Mbits/sec   0.531 ms    0/  131 (0%)
[  3] 21.0-22.0 sec   128 KBytes  1.05 Mbits/sec   0.609 ms    0/  131 (0%)
[  3] 22.0-23.0 sec   128 KBytes  1.05 Mbits/sec   0.454 ms    0/  131 (0%)
[  3] 23.0-24.0 sec   129 KBytes  1.06 Mbits/sec   0.662 ms    0/  132 (0%)
[  3] 24.0-25.0 sec   127 KBytes  1.04 Mbits/sec   0.549 ms    0/  130 (0%)
[  3] 25.0-26.0 sec   129 KBytes  1.06 Mbits/sec   0.311 ms    0/  132 (0%)
[  3] 26.0-27.0 sec   127 KBytes  1.04 Mbits/sec   0.314 ms    0/  130 (0%)
[  3] 27.0-28.0 sec   129 KBytes  1.06 Mbits/sec   0.333 ms    0/  132 (0%)
[  3] 28.0-29.0 sec   128 KBytes  1.05 Mbits/sec   0.755 ms    0/  131 (0%)
[  3] 29.0-30.0 sec   128 KBytes  1.05 Mbits/sec   0.330 ms    0/  131 (0%)
[  3]  0.0-30.0 sec  3.75 MBytes  1.05 Mbits/sec   0.332 ms    0/ 3932 (0%)
[  3]  0.0-30.0 sec  1 datagrams received out-of-order
node04
------------------------------------------------------------
Client connecting to 192.168.0.1, UDP port 5001
Sending 1000 byte datagrams
UDP buffer size: 9.00 KByte (default)
------------------------------------------------------------
[  3] local 192.168.0.2 port 39632 connected with 192.168.0.1 port 5001
[ ID] Interval       Transfer     Bandwidth
[  3]  0.0- 1.0 sec   128 KBytes  1.05 Mbits/sec
[  3]  1.0- 2.0 sec   128 KBytes  1.05 Mbits/sec
[  3]  2.0- 3.0 sec   128 KBytes  1.05 Mbits/sec
[  3]  3.0- 4.0 sec   128 KBytes  1.05 Mbits/sec
[  3]  4.0- 5.0 sec   128 KBytes  1.05 Mbits/sec
[  3]  5.0- 6.0 sec   128 KBytes  1.05 Mbits/sec
[  3]  6.0- 7.0 sec   128 KBytes  1.05 Mbits/sec
[  3]  7.0- 8.0 sec   129 KBytes  1.06 Mbits/sec
[  3]  8.0- 9.0 sec   127 KBytes  1.04 Mbits/sec
[  3]  9.0-10.0 sec   129 KBytes  1.06 Mbits/sec
[  3] 10.0-11.0 sec   128 KBytes  1.05 Mbits/sec
[  3] 11.0-12.0 sec   128 KBytes  1.05 Mbits/sec
[  3] 12.0-13.0 sec   128 KBytes  1.05 Mbits/sec
[  3] 13.0-14.0 sec   128 KBytes  1.05 Mbits/sec
[  3] 14.0-15.0 sec   128 KBytes  1.05 Mbits/sec
[  3] 15.0-16.0 sec   128 KBytes  1.05 Mbits/sec
[  3] 16.0-17.0 sec   128 KBytes  1.05 Mbits/sec
[  3] 17.0-18.0 sec   128 KBytes  1.05 Mbits/sec
[  3] 18.0-19.0 sec   128 KBytes  1.05 Mbits/sec
[  3] 19.0-20.0 sec   128 KBytes  1.05 Mbits/sec
[  3] 20.0-21.0 sec   128 KBytes  1.05 Mbits/sec
[  3] 21.0-22.0 sec   128 KBytes  1.05 Mbits/sec
[  3] 22.0-23.0 sec   129 KBytes  1.06 Mbits/sec
[  3] 23.0-24.0 sec   128 KBytes  1.05 Mbits/sec
[  3] 24.0-25.0 sec   128 KBytes  1.05 Mbits/sec
[  3] 25.0-26.0 sec   128 KBytes  1.05 Mbits/sec
[  3] 26.0-27.0 sec   128 KBytes  1.05 Mbits/sec
[  3] 27.0-28.0 sec   128 KBytes  1.05 Mbits/sec
[  3] 28.0-29.0 sec   128 KBytes  1.05 Mbits/sec
[  3] 29.0-30.0 sec   128 KBytes  1.05 Mbits/sec
[  3]  0.0-30.0 sec  3.75 MBytes  1.05 Mbits/sec
[  3] Sent 3933 datagrams
[  3] WARNING: did not receive ack of last datagram after 10 tries.
node02
------------------------------------------------------------
Server listening on UDP port 5001
Receiving 1470 byte datagrams
UDP buffer size: 41.1 KByte (default)
------------------------------------------------------------
[  3] local 192.168.0.1 port 5001 connected with 192.168.0.2 port 39632
[ ID] Interval       Transfer     Bandwidth        Jitter   Lost/Total Datagrams
[  3]  0.0- 1.0 sec   127 KBytes  1.04 Mbits/sec   0.306 ms    0/  130 (0%)
[  3]  1.0- 2.0 sec   128 KBytes  1.05 Mbits/sec   0.534 ms    0/  131 (0%)
[  3]  2.0- 3.0 sec   128 KBytes  1.05 Mbits/sec   0.450 ms    0/  131 (0%)
[  3]  3.0- 4.0 sec   128 KBytes  1.05 Mbits/sec   0.698 ms    0/  131 (0%)
[  3]  4.0- 5.0 sec   128 KBytes  1.05 Mbits/sec   0.438 ms    0/  131 (0%)
[  3]  5.0- 6.0 sec   128 KBytes  1.05 Mbits/sec   0.613 ms    0/  131 (0%)
[  3]  6.0- 7.0 sec   128 KBytes  1.05 Mbits/sec   0.334 ms    0/  131 (0%)
[  3]  7.0- 8.0 sec   129 KBytes  1.06 Mbits/sec   0.655 ms    0/  132 (0%)
[  3]  8.0- 9.0 sec   127 KBytes  1.04 Mbits/sec   0.586 ms    0/  130 (0%)
[  3]  9.0-10.0 sec   129 KBytes  1.06 Mbits/sec   0.537 ms    0/  132 (0%)
[  3] 10.0-11.0 sec   128 KBytes  1.05 Mbits/sec   0.399 ms    0/  131 (0%)
[  3] 11.0-12.0 sec   128 KBytes  1.05 Mbits/sec   0.414 ms    0/  131 (0%)
[  3] 12.0-13.0 sec   128 KBytes  1.05 Mbits/sec   0.361 ms    0/  131 (0%)
[  3] 13.0-14.0 sec   128 KBytes  1.05 Mbits/sec   0.312 ms    0/  131 (0%)
[  3] 14.0-15.0 sec   128 KBytes  1.05 Mbits/sec   0.588 ms    0/  131 (0%)
[  3] 15.0-16.0 sec   128 KBytes  1.05 Mbits/sec   0.435 ms    0/  131 (0%)
[  3] 16.0-17.0 sec   128 KBytes  1.05 Mbits/sec   0.727 ms    0/  131 (0%)
[  3] 17.0-18.0 sec   128 KBytes  1.05 Mbits/sec   0.472 ms    0/  131 (0%)
[  3] 18.0-19.0 sec   128 KBytes  1.05 Mbits/sec   0.466 ms    0/  131 (0%)
[  3] 19.0-20.0 sec   128 KBytes  1.05 Mbits/sec   0.432 ms    0/  131 (0%)
[  3] 20.0-21.0 sec   128 KBytes  1.05 Mbits/sec   0.269 ms    0/  131 (0%)
[  3] 21.0-22.0 sec   128 KBytes  1.05 Mbits/sec   0.593 ms    0/  131 (0%)
[  3] 22.0-23.0 sec   129 KBytes  1.06 Mbits/sec   0.706 ms    0/  132 (0%)
[  3] 23.0-24.0 sec   128 KBytes  1.05 Mbits/sec   0.503 ms    0/  131 (0%)
[  3] 24.0-25.0 sec   128 KBytes  1.05 Mbits/sec   0.475 ms    0/  131 (0%)
[  3] 25.0-26.0 sec   128 KBytes  1.05 Mbits/sec   0.916 ms    0/  131 (0%)
[  3] 26.0-27.0 sec   128 KBytes  1.05 Mbits/sec   0.560 ms    0/  131 (0%)
[  3] 27.0-28.0 sec   128 KBytes  1.05 Mbits/sec   0.352 ms    0/  131 (0%)
[  3] 28.0-29.0 sec   128 KBytes  1.05 Mbits/sec   0.513 ms    0/  131 (0%)
[  3] 29.0-30.0 sec   128 KBytes  1.05 Mbits/sec   0.523 ms    0/  131 (0%)
[  3]  0.0-30.0 sec  3.75 MBytes  1.05 Mbits/sec   0.552 ms    0/ 3932 (0%)
[  3]  0.0-30.0 sec  1 datagrams received out-of-order
おしまい
どちらかと言うと、TRILLを使う前の下準備の方がノウハウ溜まる。
で、これギリギリ動いたケースで書いてるんだけど、クッソ不安定。ヤバい。
一応最短経路はちゃんと通るっぽいけど...
本当はLink Downさせてロードバランスカッコいいとか言いたかったけど、ちょっと時間取れそうになくて取りやめ。(単にe1000g3削除して2本にしたら動くとは思うけど、それじゃフルメッシュの価値がだな...)
MTU変えてロングフレームサポートに至っては、ISISがちゃんと動かなくてループする。TRILLなのにループするとか何それこわい。
VLAN追加したらサービス再起動とかも運用考えたらかなりヤバい。しなくてもいいのかもしれないけど、しないと10分待っても疎通しない。遅すぎ。
あと、OpenIndianaの実装は、IETF TRILLだからテナントの分離を考えたFGL実装は多分無い。
まぁ、一体誰が好き好んで汎用x86箱にOpenIndiana入れてTRILL使うのだ、と言う話もある。
でもSolaris良く知らないから、ここ違うよっての教えて貰えると助かります。まともにTRILLが動いたらそれはそれで楽しいので...
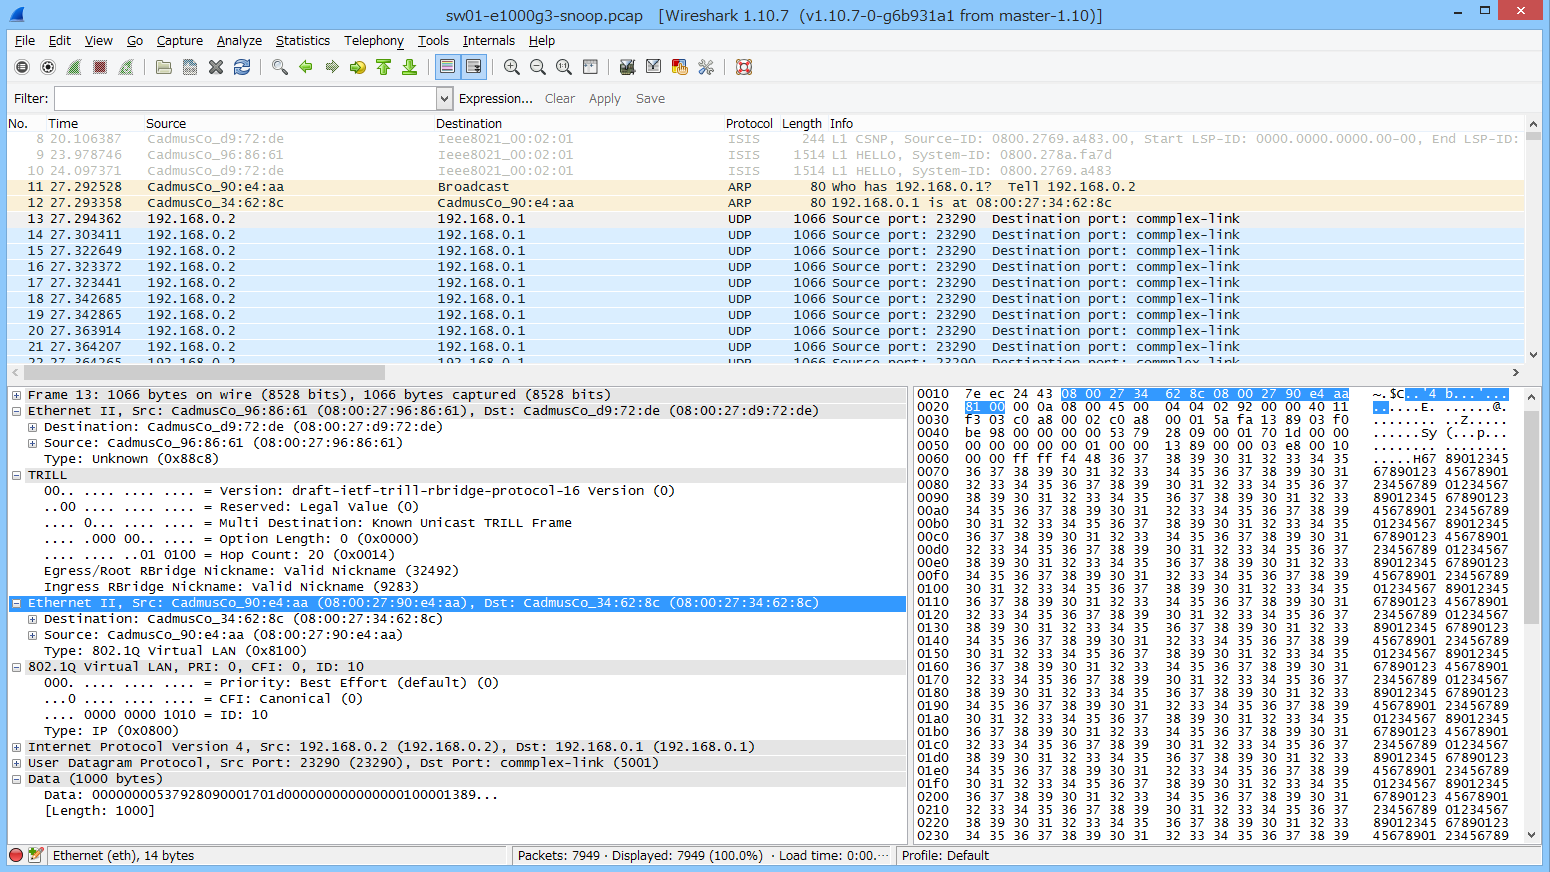
今回取得したpcapファイルは、こちらです。
- https://www.ainoniwa.net/data/pcap/sw01-e1000g1-snoop.pcap
- https://www.ainoniwa.net/data/pcap/sw01-e1000g2-snoop.pcap
- https://www.ainoniwa.net/data/pcap/sw01-e1000g3-snoop.pcap
- https://www.ainoniwa.net/data/pcap/sw01-e1000g4-snoop.pcap
- https://www.ainoniwa.net/data/pcap/sw04-e1000g1-snoop.pcap
- https://www.ainoniwa.net/data/pcap/sw04-e1000g2-snoop.pcap
- https://www.ainoniwa.net/data/pcap/sw04-e1000g3-snoop.pcap
- https://www.ainoniwa.net/data/pcap/sw04-e1000g4-snoop.pcap
Decode asからTRILLを選択すると、こんな感じで見えます。

蛇足
LinuxにおけるTRILL実装というと、この辺りですかね?
でも、カーネルの入れ替え説明が面倒だったから...あとopenvswitchとの兼ね合いが...
