Proxmox VE 7.0で追加されたdownload-url APIを使おう
Posted on 2021/08/13(Fri) 21:30 in technical
概要
Proxmox VE 7.0になり、新しくStorageに直接ISOなどのイメージファイルをダウンロードさせる機能が追加されました。
今までは手元のイメージファイルをアップロードしたりしていたのですが、この機能が使えれば細い回線経由でのイメージ追加がかなり快適になりそうなので、早速動きを確認したいと思います。
Support downloading ISO and Cont appliance images directly from a URL to a storage, including optional checksum verifications.
https://pve.proxmox.com/wiki/Roadmap#Proxmox_VE_7.0 より
APIの情報
いつものように Proxmox VE API Documentation を見に行きましょう。(いつものように...?)
該当のAPIは Download templates and ISO images by using an URL. ですね。
pveshからdownload-urlを使う
早速、rootでログインしてpveshからdownload-urlを実行します。
pveshは内部的にはProxmox VE APIを叩いているので、こいつで動けばリモートからProxmox VE APIを叩いても同じ事ができると考えて良いはずです。
root@pve7-01:~# pvesh usage /nodes/pve7-01/storage/local/download-url
USAGE: pvesh create /nodes/pve7-01/storage/local/download-url --content <string> --filename <string> --url <string> [OPTIONS]
root@pve7-01:~# pvesh create /nodes/pve7-01/storage/local/download-url --content iso --filename ubuntu-20.04-server-cloudimg-amd64.img --url https://cloud-images.ubuntu.com/releases/focal/release/ubuntu-20.04-server-cloudimg-amd64.img --checksum 1d3f69a8984a79bf86fb076ef9b2d6e66ba319bb92845b5ed025d0b4e0dcb579 --checksum-algorithm sha256
downloading https://cloud-images.ubuntu.com/releases/focal/release/ubuntu-20.04-server-cloudimg-amd64.img to /var/lib/vz/template/iso/ubuntu-20.04-server-cloudimg-amd64.img
--2021-08-11 00:20:54--  https://cloud-images.ubuntu.com/releases/focal/release/ubuntu-20.04-server-cloudimg-amd64.img
Resolving cloud-images.ubuntu.com (cloud-images.ubuntu.com)... 91.189.91.124, 91.189.91.123, 2001:67c:1562::25, ...
Connecting to cloud-images.ubuntu.com (cloud-images.ubuntu.com)|91.189.91.124|:443... connected.
HTTP request sent, awaiting response... 200 OK
Length: 561184768 (535M) [application/octet-stream]
Saving to: '/var/lib/vz/template/iso/ubuntu-20.04-server-cloudimg-amd64.img.tmp.4132'
     0K ........ ........ ........ ........  5% 5.42M 93s
 32768K ........ ........ ........ ........ 11% 7.97M 73s
 65536K ........ ........ ........ ........ 17% 7.11M 66s
 98304K ........ ........ ........ ........ 23% 8.26M 58s
131072K ........ ........ ........ ........ 29% 8.00M 52s
163840K ........ ........ ........ ........ 35% 7.31M 48s
196608K ........ ........ ........ ........ 41% 8.04M 43s
229376K ........ ........ ........ ........ 47% 7.46M 38s
262144K ........ ........ ........ ........ 53% 6.94M 34s
294912K ........ ........ ........ ........ 59% 7.71M 29s
327680K ........ ........ ........ ........ 65% 8.42M 25s
360448K ........ ........ ........ ........ 71% 6.99M 21s
393216K ........ ........ ........ ........ 77% 8.06M 16s
425984K ........ ........ ........ ........ 83% 7.63M 12s
458752K ........ ........ ........ ........ 89% 8.51M 7s
491520K ........ ........ ........ ........ 95% 7.09M 3s
524288K ........ ........ .......          100% 6.02M=72s
2021-08-11 00:22:07 (7.40 MB/s) - '/var/lib/vz/template/iso/ubuntu-20.04-server-cloudimg-amd64.img.tmp.4132' saved [561184768/561184768]
calculating checksum...OK, checksum verified
download of 'https://cloud-images.ubuntu.com/releases/focal/release/ubuntu-20.04-server-cloudimg-amd64.img' to '/var/lib/vz/template/iso/ubuntu-20.04-server-cloudimg-amd64.img' finished
UPID:pve7-01:00001024:00022706:61129956:download:ubuntu-20.04-server-cloudimg-amd64.img:root@pam:
Note
ISO を格納する設定になっているStorageには、クラウドイメージも格納することができます。
実行後のタスクに関する情報は、通常のtasks APIから取得することができます。
root@pve7-01:~# pvesh get /nodes/pve7-01/tasks/UPID:pve7-01:00001024:00022706:61129956:download:ubuntu-20.04-server-cloudimg-amd64.img:root@pam:/status --output-format json | python3 -m json.tool
{
    "exitstatus": "OK",
    "id": "ubuntu-20.04-server-cloudimg-amd64.img",
    "node": "pve7-01",
    "pid": 4132,
    "pstart": 141062,
    "starttime": 1628608854,
    "status": "stopped",
    "type": "download",
    "upid": "UPID:pve7-01:00001024:00022706:61129956:download:ubuntu-20.04-server-cloudimg-amd64.img:root@pam:",
    "user": "root@pam"
}
残念ながら、CHECKSUMは固定の文字列のみで、CHECKSUMファイルのURLを指定することはできませんでした。
root@pve7-01:~# pvesh create /nodes/pve7-01/storage/local/download-url --content iso --filename ubuntu-20.04-server-cloudimg-amd64.img --url https://cloud-images.ubuntu.com/releases/focal/release/ubuntu-20.04-server-cloudimg-amd64.img --checksum https://cloud-images.ubuntu.com/releases/focal/release/SHA256SUMS --checksum-algorithm sha256
downloading https://cloud-images.ubuntu.com/releases/focal/release/ubuntu-20.04-server-cloudimg-amd64.img to /var/lib/vz/template/iso/ubuntu-20.04-server-cloudimg-amd64.img
calculating checksum of existing file...
checksum mismatch: got '1d3f69a8984a79bf86fb076ef9b2d6e66ba319bb92845b5ed025d0b4e0dcb579' != expect 'https://cloud-images.ubuntu.com/releases/focal/release/SHA256SUMS', aborting
UPID:pve7-01:00001339:0002AD8A:61129AAE:download:ubuntu-20.04-server-cloudimg-amd64.img:root@pam:
CHECKSUMは省略可能なので、イメージを雑に試すようなケースでは省略していいと思います。
proxmoxer ライブラリから叩く
Pythonでは proxmoxer というProxmox VE APIを叩けるライブラリがあります。
こちらを使って、リモートからAPI経由でイメージファイルのダウンロードを実行してみます。
proxmoxer のAPIクライアントはバックエンドが選べたりするので、環境にあったものを使用してください。
今回は、事前に発行したAPIトークンを使います。
(username/passwordを使用してAPIトークンを都度生成することができるのですが、トークンの有効期間が短く、トークンの再取得処理を入れるのは避けたいので)
APIトークンは以下のように取得します。(サンプル)
-
トークンの発行ユーザーとトークンIDを指定します。 "Privilege Sepatation" のチェックを外すと、発行ユーザーの権限でAPIが叩けます。
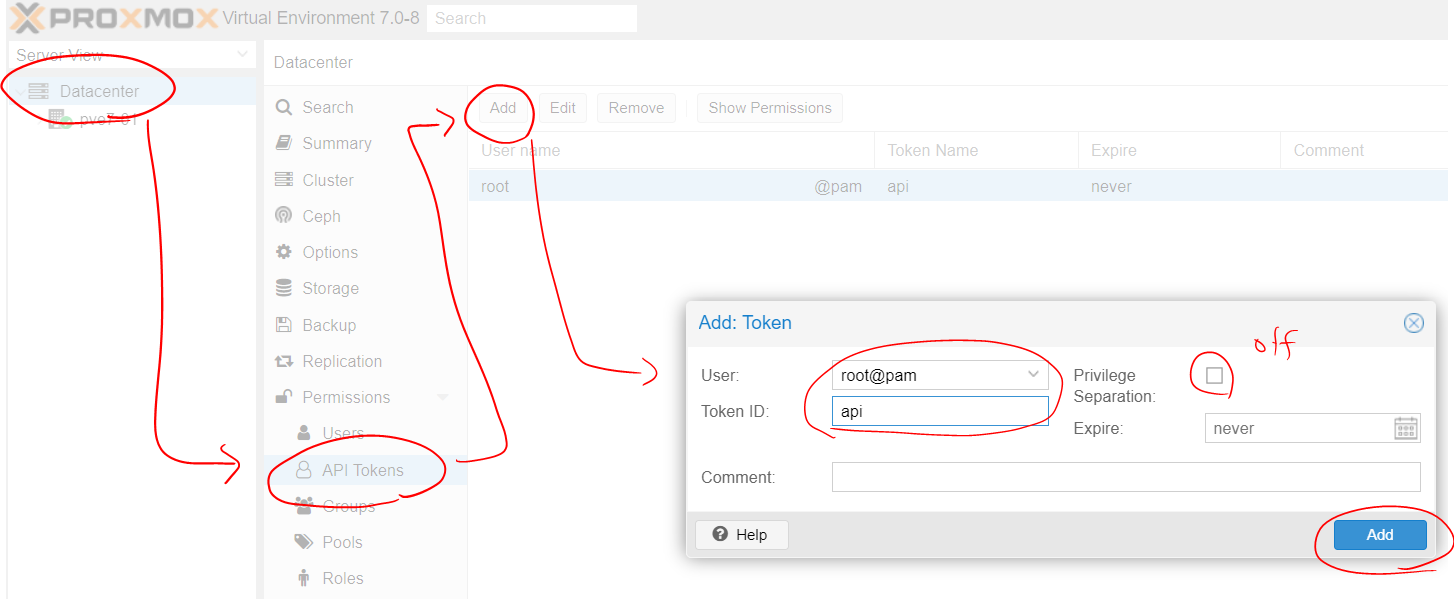
-
トークンが表示されます。
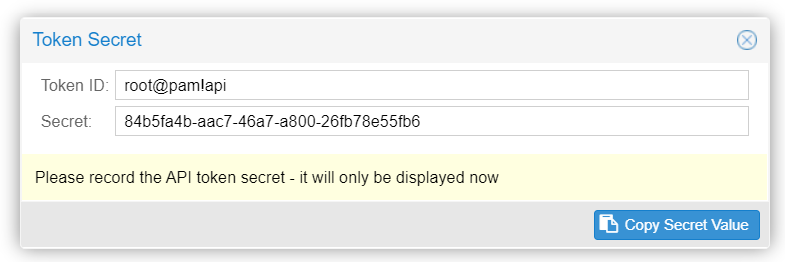
Note
ここで表示されるトークンをコピーし忘れると、確認方法が無くなるので気を付けましょう。
それでは、取得したトークンを使用して、APIを叩いてみましょう。
>>> from proxmoxer import ProxmoxAPI
>>> api = ProxmoxAPI('192.168.122.21', user='root@pam', token_name='api', token_value='36cfaf2e-9dae-4239-8e36-975dace3e8aa')
>>> pid = api.nodes("pve7-01").storage("local").post('download-url', content="iso", filename="ubuntu-20.04-server-cloudimg-amd64_2.img", url="https://cloud-images.ubuntu.com/releases/focal/release/ubuntu-20.04-server-cloudimg-amd64.img")
Resetting dropped connection: 192.168.122.21
https://192.168.122.21:8006 "POST /api2/json/nodes/pve7-01/storage/local/download-url HTTP/1.1" 200 114
>>> api.nodes("pve7-01").tasks(pid).get('status')
Resetting dropped connection: 192.168.122.21
https://192.168.122.21:8006 "GET /api2/json/nodes/pve7-01/tasks/UPID:pve7-01:00003575:0008B8D9:6112AA27:download:ubuntu-20.04-server-cloudimg-amd64_2.img:root@pam!api:/status HTTP/1.1" 200 310
{'type': 'download', 'tokenid': 'api', 'id': 'ubuntu-20.04-server-cloudimg-amd64_2.img', 'user': 'root@pam', 'node': 'pve7-01', 'upid': 'UPID:pve7-01:00003575:0008B8D9:6112AA27:download:ubuntu-20.04-server-cloudimg-amd64_2.img:root@pam!api:', 'pid': 13685, 'starttime': 1628613159, 'pstart': 571609, 'status': 'running'}
>>> api.nodes("pve7-01").tasks(pid).get('status')
Resetting dropped connection: 192.168.122.21
https://192.168.122.21:8006 "GET /api2/json/nodes/pve7-01/tasks/UPID:pve7-01:00003575:0008B8D9:6112AA27:download:ubuntu-20.04-server-cloudimg-amd64_2.img:root@pam!api:/status HTTP/1.1" 200 328
{'pid': 13685, 'node': 'pve7-01', 'upid': 'UPID:pve7-01:00003575:0008B8D9:6112AA27:download:ubuntu-20.04-server-cloudimg-amd64_2.img:root@pam!api:', 'user': 'root@pam', 'id': 'ubuntu-20.04-server-cloudimg-amd64_2.img', 'type': 'download', 'tokenid': 'api', 'pstart': 571609, 'status': 'stopped', 'starttime': 1628613159, 'exitstatus': 'OK'}
ちなみに、上書きしようとすると以下のように失敗します。
>>> pid = api.nodes("pve7-01").storage("local").post('download-url', content="iso", filename="ubuntu-20.04-server-cloudimg-amd64_2.img", url="https://cloud-images.ubuntu.com/releases/focal/release/ubuntu-20.04-server-cloudimg-amd64.img")
>>> import json
>>> print(json.dumps(api.nodes("pve7-01").tasks(pid).get('status'), indent=2))
{
  "node": "pve7-01",
  "starttime": 1629540211,
  "tokenid": "api",
  "id": "ubuntu-20.04-server-cloudimg-amd64_2.img",
  "type": "download",
  "status": "stopped",
  "pstart": 77461843,
  "upid": "UPID:pve7-01:000C1631:049DF953:6120CF73:download:ubuntu-20.04-server-cloudimg-amd64_2.img:root@pam!apidev:",
  "exitstatus": "refusing to override existing file '/var/lib/vz/template/iso/ubuntu-20.04-server-cloudimg-amd64_2.img'",
  "pid": 792113,
  "user": "root@pam"
}
終わり
これで、APIを使用してリモートのProxmox VEにイメージをダウンロードさせることが出来るようになりました。
出来ればAPIで qm import-disk 相当のものが使えると良いのですが、今のところCLI限定です。
代わりに move_disk APIが使えますが、ディスク名を調整するのが少々面倒なところ。